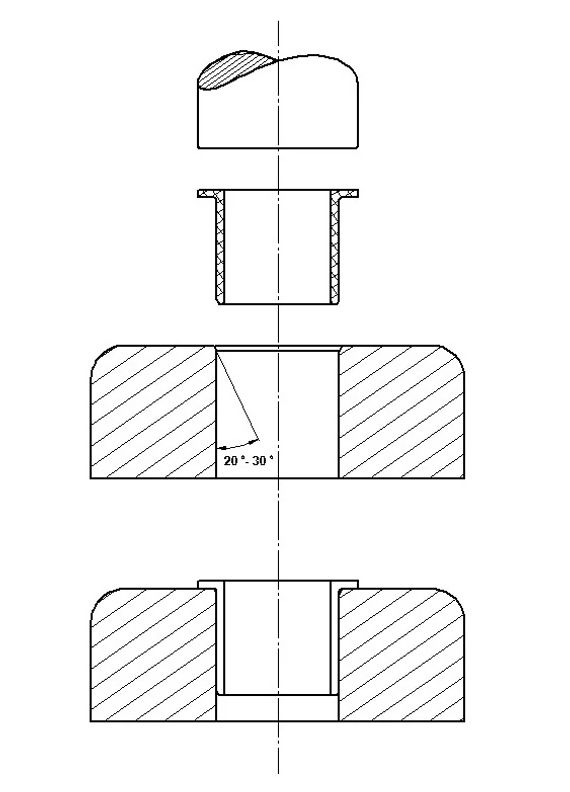
What must be observed when mounting iglidur® plain bearings?

Installation
iglidur® plain bearings are press-fit bearings. The inner diameter adjusts itself only after the bearing has been press-fitted in the H7 housing hole with the recommended tolerance. The press-fit interference can be up to 2% of the inner diameter. This ensures that the bearing is securely press-fitted. Axial or radial movement in the housing are also prevented in this way.
The hole in the housing should be produced with the recommended tolerance (H7) for all bearings and be smooth, flat and chamfered at between 20 and 30 degrees.
The bearing should be press-fitted using a flat press. The use of centring or calibrating pins can cause damage to the bearings and bring a greater amount of clearance.

Tolerances and measurement system
The installation dimensions and tolerances of iglidur® plain bearings are a function of the material and wall thicknesses. For each material, the moisture absorption and the thermal expansion are decisive factors. Plain bearings with low moisture absorption can be designed with a minimal bearing clearance. The rule of thumb for wall thickness: the thicker the wall of the bearings, the larger the clearances must be.Therefore, different tolerance classes exist for iglidur® plain bearings. Within these tolerances, iglidur® plain bearings can operate in the permissible temperature range and in humidity conditions up to 70% according to the installation recommendations. Should higher air moisture levels be present, or the bearing be used underwater, materials with low moisture absorption are to be preferred.
Check that the bearing is seated correctly
iglidur® plain bearings are press-fit bearings for housings with a standard H7 hole. This press-fitting of the bearings fixes the bearings in place in the housing, and the final inner diameter of the plain bearings is not arrived at until the bearing has been press-fitted. The bearing size test is performed when the bearing is installed in the hole with the minimum specified dimension; both using a dial gauge and a plug gauge.- The "Go-Side" of the plug gauge, pressed into the hole, must pass easily through the bearing
- With the 3 point probe, the inner diameter of the bearing must lie within the prescribed tolerance on the measurement plane (diagram 1)
Causes for dimensional deviations
In spite of careful manufacturing and assembly of the bearings, differences and questions regarding the recommended installation dimensions and tolerances can result. For this reason, we have compiled a list of the most frequent reasons for differences. In many cases, with this troubleshooter, the reasons for the differences can be found quickly:- The hole is not chamfered correctly, so the bearing material is removed upon press-fitting
- A centring pin was used which expanded the inside diameter of the bearing during press-fit
- The hole does not meet the recommended housing hole specifications (usually H7)
- The housing is made out of a soft material that was expanded by the bearing installation
- The shaft is not within recommended tolerances
- The measuring is not performed within the measuring lines
Adhesion
It is not usually necessary to use an adhesive to fit the bearing. If a bearing is likely to lose its firm fit on account of high temperatures, a more temperature-resistant plain bearing should be used. If, however, there are plans to secure the bearings with adhesive, it will be necessary to perform suitable tests in each case. It is not possible to simply transfer the successful results seen in other applications.
Machining
iglidur plain bearings are delivered ready-to-fit. The extensive product line makes it possible to use a standard dimension in most cases. If for some reason, a subsequent machining of the plain bearing is necessary, the adjacent table shows the machining standard values. The subsequent machining of the sliding surfaces is to be avoided if possible. Higher wear rate is most often the result. An exception is, for example, iglidur M250 which is very suitable for subsequent machining. In other iglidur plain bearings, disadvantages of a sliding surface machining can be counteracted by lubrication during installation.
Guidelines for machining
| Procedure | Turning | Drilling | Milling |
| Tool material | SS | SS | SS |
| Feed [mm] | 0,1 ... 0,5 | 0,1 ... 0,5 | to 0.5 |
| Clearance angle | 5 ... 15 | 10 ... 12 | |
| Clamping angle | 0 ... 10 | 3 ... 5 | |
| Cutting- speed [m/min] | 200 ... 500 | 50 ... 100 | to 1000 |